
Introduction
Jupyter notebooks have become the staple integrated development environment (IDE) of many scientists around the world – and for good reason too. Just to list a few of the advantages of the Jupyter notebooks:
- They very clearly demonstrate your workflow in the most intuitive way possible – as a single document that reads from top to bottom, with code output shown adjacent to the code that produced it.
- Since cells in a Jupyter notebook must (or should) be executed consecutively from top to bottom, they inherently encourage you to develop a workflow that is reproducible.
- Your code and output are easily shareable (e.g. as a .pdf), even to those who don’t have a programming environment set up on their own machines.
- They’re perfect for rapid exploratory data analysis, as you can quickly and interactively make visualizations one after the other, preserving previous output within the same document.
However, there are certain situations in which these advantages of the Jupyter notebook become non-ideal. Again, to list just a few:
- When there is good reason for you not to execute all of your code consecutively in full each time you want to build on your prior work. For example, perhaps there is a step in your workflow that is computationally expensive, for which you would only like to re-execute the code if that particular step needs to be modified. If this code was sitting somewhere in the middle of a Jupyter notebook, each time you restarted the kernel, you would need to run through this computationally expensive step to get to the latter part of your notebook.
- When your code is likely to be re-used for different input multiple times. For example, perhaps you have a data processing step that you’d like to just run every time you get a new batch of data. You could open up your Jupyter notebook, change the path to the input file, and run the Jupyter notebook again, but it would be faster/easier to just run this code as a script from the command line.
- When you’d like to more easily keep track of changes made to the code itself. Since Jupyter notebooks store the code output within the .ipynb file, small changes to the code that produce qualitatively small changes to the output (e.g. changing the x-axis limits on a figure) can appear as large changes to the code by version tracking software such as git.
- When your code needs to be put into a production pipeline, they cannot be written in Jupyter notebooks.
Ultimately, there are certain situations in which it is better to have your code in .py files rather than .ipynb files. Unfortunately, Jupyter does not currently deal with .py files very well… fortunately, there are of course several IDE’s that are designed to make the development of Python code in .py files as seamless as possible.
Installation
Here I just wanted to share how to get quickly set up with one of these IDE’s: Visual Studio Code (VSCode). As we’ll see in a second, VSCode can make the development of .py files very similar to writing code in Jupyter notebooks through their “Python Interactive window”, which works almost like a Jupyter notebook, but with direct interaction with .py files. As someone who works most often with Jupyter notebooks, this Jupyter notebook-like Python Interactive window makes the transition to working with .py files very accessible. And it’s free, so there is no financial barrier to giving it a crack.
The following is all that is required to get started with a basic Python set up with some obviously helpful additional functionality:
- Download and install VSCode.
- Install the following Extensions:
- Python
- The core VSCode extension for Python.
- Path Intellisense
- Allows auto-complete of paths to files/folders on your machine.
- Python Indent
- Automatically indents your code based on Python rules (e.g. after a function definition).
- Python
- Disable this setting by searching for it in the Settings menu (to allow Path Intellisense to work correctly):
- Typescript Suggest Paths
Getting Started
Once you have followed these steps, you can start working on your project by navigating to File > Add Folder to Workspace…
Of course how exactly you use your new IDE is up to your personal preference, but I have found the following to work well for me as someone who most often works with Jupyter notebooks:
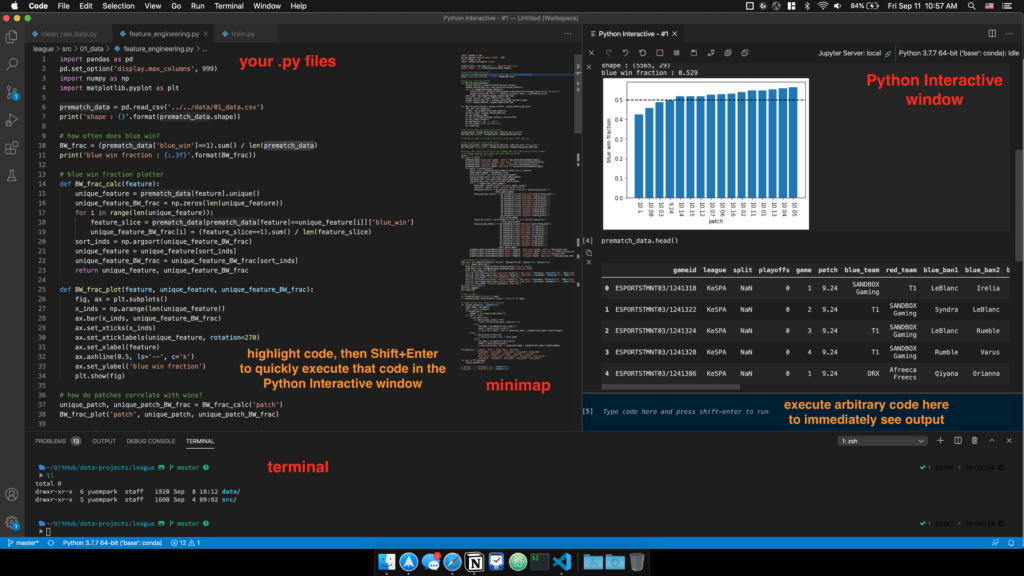
As you can see, the Python Interactive window is effectively a Jupyter notebook, in that code output is shown immediately below the code that generated it. This allows you to quickly make visualizations and test code (just like you would in a Jupyter notebook) while keeping your code tidy within .py files.
Some tips that I find to be very useful:
- You can quickly execute any chunk of code in your .py file by selecting it, then hitting Shift+Enter.
- You can use the Python Interactive window as a scratchpad by executing arbitrary code in the input area. This keeps your .py file clear of any code that isn’t intended to be kept in the final version of the .py file (e.g. quickly looking at your pandas dataframe via df.head()).
- You can limit the scope of search (and replace) to certain sections of your .py file by highlighting that particular section of code then selecting “Seach in Selection” when searching your .py file.
Anyway, while I myself am still relatively new to VSCode, I was unable to find these steps/tips in any single concise document online, and so I share them here in the hopes that someone else will find them to be useful.